Cornice per Foto "3 Bordi" / Simple Photo Frame "3 Borders"
Facile - Easy

Questo/a opera è pubblicato/a sotto una Licenza Creative Commons.
VIDEO:
- ( "L1" )
Iniziate facendo una copia del livello base e rinominatelo in "l1".
You must start copying your initial layer and rename it as "l1". - Ora andate in Colori / Luminosità e Contrasto:
Now go on: Colors/ Brightness & Contrast:
- Ora andate in Colori / Sfocature / Selettiva Gaussiana:
Now go on: Colors/ Blur / Selective Gaussian Blur:
- Settate questo livello su "Schermo".
Set this layer as "Screen".
- ( "L2" )
Create un nuovo livello "l2", create una piccola selezione nell'immagine e poi andate su:
Selezione / Distorci
Make a new empty layer, call it "l2", create a small selection in to this layer and then go:
Selection / Distort
- Andate su: Seleziona / Inverti e riempite di bianco il livello e settatelo su "luce debole".
Go on: Selection / Invert fill this layer with white and set it as "Soft Light".
- Andate su: Filtri / Luce ed Ombre / Proietta ombra
Go on: Filter / Light & Shadow / Dropshadow
- Seleziona / Niente.
Selection / none.
- ( "L3" In cima alla lista dei livelli - put on the top of the layer stack ).
Create un nuovo livello "l3", create una media selezione nell'immagine e poi andate su:
Selezione / Distorci
Make a new empty layer, call it "l3", create a medium selection in to this layer and then go:
Selection / Distort
- Andate su: Seleziona / Inverti e riempite con #827e79 ( 130 126 121 ) il livello e settatelo su "differenza".
Go on: Selection / Invert fill this layer with #827e79 ( 130 126 121 ) and set it as "difference".
- Andate su: Filtri / Luce ed Ombre / Proietta ombra
Go on: Filter / Light & Shadow / Dropshadow
- Seleziona / Niente.
Selection / none.
- ( "L4" In cima alla lista dei livelli - put on the top of the layer stack ).
Create un nuovo livello "l4", create una grande selezione nell'immagine e poi andate su:
Selezione / Distorci
Make a new empty layer, call it "l4", create a big selection in to this layer and then go:
Selection / Distort
- Andate su: Seleziona / Inverti e riempite con il nero.
Go on: Selection / Invert fill this layer with black.
- Andate su: Filtri / Luce ed Ombre / Proietta ombra
Go on: Filter / Light & Shadow / Dropshadow
- Seleziona / Niente.
Selection / none.


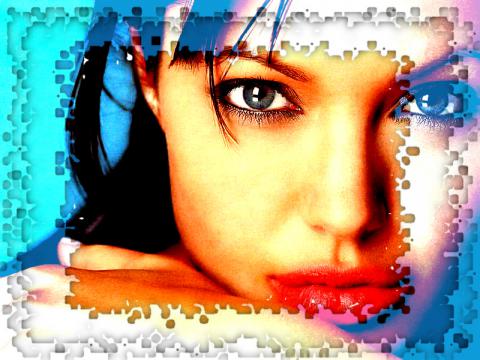
Final Result
Ecco il risultato finale - Ecco the Resulting Image.
Versione alternativa // Alteration 1
Per creare una versione alternativa effettuate questi cambiamenti:
To Make an alternative version ( Alteration ) do that:
- L2
Cambiate il colore di "l2" in #075f9d ( 7 95 157 ), settatelo su "somma".
Change the "l2" coloro to #075f9d ( 7 95 157 ), set it as "addiction". - L3
Cambiate il colore al livello "l3" in bianco e settatelo su "sovrapposto".
Change the "l3" layer color to white and set it as "overlay". - L4
Settate il livello "l4" su differenza.
Set the "l4" layer to "difference".
Scaricate il file XCF qui sotto per vedere meglio queste modifiche.
Download the XCF file below to see the changes.
Alteration Final Result
Ecco il risultato finale - Ecco the Resulting Image.![]()
Gimp XCF
Potete scaricare il file originale per il Gimp ( XCF ) da questo link:
You can download the original Gimp File ( XCF ) from this link: