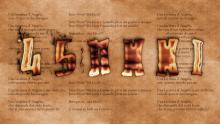
Fiore Astratto - Loto / Abstract Flower - Lotus
Facile - Easy

Questo/a opera è pubblicato/a sotto una Licenza Creative Commons.
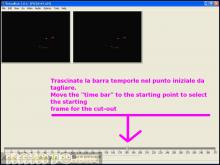
VIDEO:
L'immagine di Base - The Base image (type 1)
- Aprite Gimp e create una nuova immagine con sfondo nero di forma quadrata, ovvero con larghezza e altezza uguali.
Run Gimp and create a new squared image with black background, in other words width and height must be of the same.
- Create un nuovo livello e chiamatelo "l1", create una guida orizontale e una verticale per trovare il centro.
Per creare una guida basta fare click sulla barra orizontale o verticale posta sopra l'immagine, tenendo premuto il tasto sinistro del mouse posizionatela dove occorre.
Oppure usate: Immagine / Guide / Nuova guida.
Create a new level and call it "l1", create a new orizontal and verrtical ruler to mark the center.
To make a ruler/guide click on the orizontal or vertical bar over the image, hold the left button and than move the mouse to find the correct position.
Or use this: Image / Guides / New Guide
- Stiamo lavorando sul livello "l1"; Selezionate lo strumento "sfumatura" e settatelo come in figura:
We are working on "l1"; Select the "blend" tool and set the value the same of this image:
{ Cold Steel 2 - Shape: SpiralForm Clockwise / Cold Steel 2 - Forma: SpiralForm Clockwise }
- Dal centro dell'immagine spostate il mouse verso il bordo destro, rilasciate il tasto sinistro del mouse.
From the center of your image go to the right, release the left mouse button.
- Ora andate su: Filtri / Sfocatura / Gaussiana
Now go on: Filter / Blur / Gaussian Blur
- Settate il livello su "solo toni chiari".
Set the level on "LIGHTEN ONLY".
- Ora Ripeteremo gli stessi passi di prima fino aad ottenere altri 3 livelli.
Now We must repeat the same steps to get more 3 levels. - Create un nuovo livello e chiamatelo "l2", posizionatevi al centro dell'immagine e create una sfumatura che parte dal centro verso il basso.
make a new layer and call it "l2", put the mouse on the center of your image and then make a blend from the center to the bottom.
- Applicate la sfuocatura gaussiana ( CTRL+F ) e settate il livello su "SOlo toni chiari".
Apply the gaussian blur ( CTRL+F ) and set this layer on "Lighten Only".
- Ancora... Create un nuovo livello... chiamatelo "l3", dal centro dell'immagine fate partire la sfumatura fino a sinistra, sfuocate e settate su "solo toni chiari".
Again.... Crate a new layer... call it "l3", make a blend from the center go to the left, blur this layer and set it as "lighten only".
- Ultimo per questo giro... Create un nuovo livello... chiamatelo "l4", dal centro dell'immagine fate partire la sfumatura fino a sopra, sfuocate e settate su "solo toni chiari".
Last for that turn... Crate a new layer... call it "l4", make a blend from the center go to the top, blur this layer and set it as "lighten only".
- Ora dobbiamo creare altri 4 livelli nello stesso identico modo ma usando queste opzioni per la sfumatura.
We must make another 4 layer in the sme way but with this new setting for the blend tool.
- Iniziamo.
Create il livello "l5", usate lo strumento "sfumatura" dal centro dell'immagine verso il bordo destro, sfuocate il livello e settatelo su "solo toni chiari"
Here we go.
Create the "l5" layer, use the blending tool from the center to the right, blur this layer and set it as "lighten only"
- Create il livello "l6", usate lo strumento "sfumatura" dal centro dell'immagine verso il bordo inferiore, sfuocate il livello e settatelo su "solo toni chiari"
Create the "l6" layer, use the blending tool from the center to the bottom, blur this layer and set it as "lighten only"
- Create il livello "l7", usate lo strumento "sfumatura" dal centro dell'immagine verso il bordo sinistro, sfuocate il livello e settatelo su "solo toni chiari"
Create the "l7" layer, use the blending tool from the center to the left, blur this layer and set it as "lighten only"
- L8
Ultimo livello per ora.... Create il livello "l8", usate lo strumento "sfumatura" dal centro dell'immagine verso il bordo superiore, sfuocate il livello e settatelo su "solo toni chiari"
Last layer for now.... Create the "l8" layer, use the blending tool from the center to the top, blur this layer and set it as "lighten only"
- Creaiamo un nuovo livello... Chiamiamolo "colore",settiamo cosi lo strumento sfumatura scegliendo il gradiente: "Caribbean Blue".
Create a new layer... call it "color", set in this way the blend tool choosing the gradient: "Caribbean Blue".
{ Gradient: Caribbean Blue and Shape Radial // Gradiente Caribbean Blue con forma Radiale }
- Fate partire la sfumatura dal centro verso uno dei 4 bordi, io ho scelto verso l'alto, settate il livello su differenza.
Let the blend start from the center to outside, I choose to the top, set this layer as "difference"


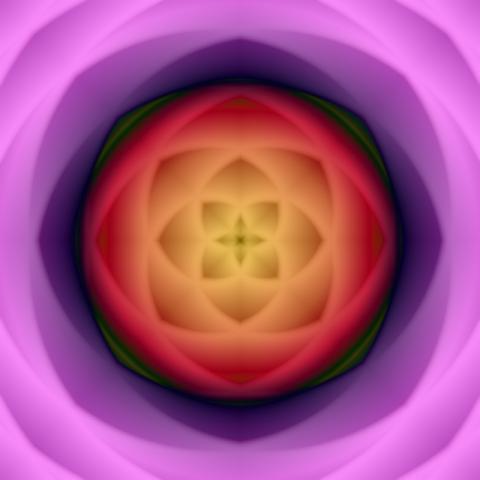
Final Result (type 1)
Ecco il risultato finale - Ecco the Resulting Image.
Ecco la base in bianco e nero, here the black & white image base.
Creaiamo una versione altenativa: Type 2 Base / Let's create an alternative version: Type2 Base
- Arrivati a creare il livello "l8" ( al punto 18 ), appiattite l'immagine ( Immagine / Appiattisci immagine ).
Whe You came to the "l8" layer ( Step 18 ), flatten the image ( Image / Flatten Image ).
- Ora andate in: Filtri / Mappa / Mappa a sbalzo.
Now go on: Filter / map / Bumpmap.
- Seguite la procedura per creare il livello colore ed avrete finito pure il "Tipo 2".
Follow the procedure to make the "color" layer nad You will "Complete" the "type 2".


Final Result (type 2)
Ecco il risultato finale - Ecco the Resulting Image.
Ecco la base in bianco e nero, here the black & white image base.
Gimp XCF
Potete scaricare il file originale per il Gimp ( XCF ) da questo link:
You can download the original Gimp File ( XCF ) from this link: