Energy
Facile - Easy

Questo/a opera è pubblicato sotto una Licenza Creative Commons.
Video:
- ( Chiamatelo / Call it:: SFONDO / BACKGROUND )
Create a new image with a white background
Create un'immagine con lo sfondo bianco. - Selezionate lo strumento "pennello" e usate il pennello "vine", usatelo in due angoli opposti.
Select the "brush" tool and use the "vine brush", brush 2 opposite corners. - Ora selezionate il pennello "sparks" e usatelo nei restanti angoli
Now select the sparks brush and use it in the 2 other corner
- Now go to: Filter / Distortion / Iwarp
Ora andate: Filtri / Distorsione / Iwarp
- ( Chiamatelo / Call it:: BLUR )
Duplicate questo livello, usate il filtro sfocatura movimento ( filtri / sfocature / movimento ) con lo zoom come in foto:
Make a copy of the background, use the motion blur filter ( filter / blur / motion blur ) with the zoom like shown in the image:
- Set this layer as: DIFFERENCE
Settate questo livello come: DIFFERENZA - ( Chiamatelo / Call it:: BD )
Create un nuovo livello ( trasparente ) e usate il pennello "sparks" nelle zone dove si vede il pennello "vine" e viceversa ( vedete la foto per evitare confusione )
Create a new level ( trasparent ) and now use the "sparks" brush to cover the zone with the "vine brush" and viceversa ( see the image to avoid confusion ).
- Now go to: Filter / Map / bumpmap choose this level as bumpmap like in the image
Andate in: Filtri / mappa / mappa a sbalzo.. usate lo stesso livello come mappa.. come mostrato nell' immagine
- Ora andate in Filtri / mappa / sposta, usate lo stesso livello come nell' immagine
Go to: Filter / Map / Displace, use this level for the displacing like shown in the image.
- Set this level as Soft light
Settate questo livello con luce soffusa - ( Chiamatelo / Call it: BD_Copy and color )
Copiate il livello
Make a copy of this level - Choose a color Colors / Colorise ( set it as HARD LIGHTs )
Scegliete un colore Colori / Colora ( settatelo come Luce forte )
- ( Chiamatelo / Call it: CVisible )
Copiate il visibile ( e incollate il nuovo livello ) - SHIFT+CTRL+C
Copy the visible ( and paste it ) - SHIFT+CTRL+C - Set it as "Grain Merge" ( Tnx to SwissMiss for the correction in the translation ghgh )
Settatelo come "Fusione grana" - ( Chiamatelo / Call it: CVisible2 )
Ancora, Copiate il visibile ( e incollate il nuovo livello ) - SHIFT+CTRL+C
Again, Copy the visible ( and paste it ) - SHIFT+CTRL+C
- Go to filter: Filter / Blur / Motion blur
Andate in: Filtri / Sfocatura / Movimento
- Set this layer as: addition
Settate questo livello come: somma - ( Chiamatelo / Call it: CVisible3 )
Per la terza volta, Copiate il visibile ( e incollate il nuovo livello ) - SHIFT+CTRL+C
For the third time, Copy the visible ( and paste it ) - SHIFT+CTRL+C - Go to filter: Filter / Blur / Motion blur
Andate in: Filtri / Sfocatura / Movimento
- Set this layer as: addition
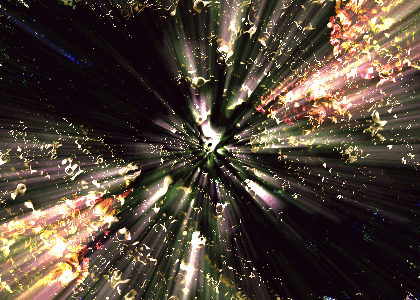
Settate questo livello come: somma - Now You must have something of similar
Ora dovreste avere qualcosa di simile
- Select the Level named: CVisible2 than go Colors / Colorize and use this values
Selezionate il livello chiamato: CVisible2 e poi andate su Colori / Colora e usate questi valori
- Select the Level named: BD_Copy and color than go Colors / Colorize and use this values
Selezionate il livello chiamato: BD_Copy and color e poi andate su Colori / Colora e usate questi valori


Risulatato Finale / Final Image:
Extra: