Golden Flower
Facile - Easy

Questo/a opera è pubblicato sotto una Licenza Creative Commons.
- Create una nuova immagine con lo sfondo nero // Create a new immage with a black background
- Create un nuovo livello e chiamatelo "flower" / Create a new layer an call it "flower"
- Disegnate una linea come nell' immagine usando il brush sparks // Make a line like the one of this image using the sparks brush
(tenente premuto shift e cliccate una volta a destra e una a sinistra finchè nn ottente qualcosa di simile // holding shift make a clik right a than to left until you get something of similar )
- Applicate sul livello "flower" il filtro: Filtro / Distorsione / Increspature // Use the filter: FIlter / Distort / Ripple on the flower layer

- Ora: Filtro / Distorsione / Coordinate Polari // And Now: Filter / Distort / Polar Coords
- Selezionate lo strumento baccheta magica e cliccate al centro del nostro fiore // Select the "magic hand" and click on the center of our "flower"
- Aumentate le dimensioni della selezione di un pixel come in immagine // Increase the size of the selection as shown in this image ( select / grow )

- Create un nuovo livello sotto "flower".
Avete ora solo 3 livelli come in foto. Chiamate questo nuovo livello "color_1" //Create a new layer under "flower".
Call the new layer "inside". Now You must have only 3 layers like the image
- Con la selezione ancora attiva usate lo strumento "brush" sempre con il pennello "sparks" per riempire il nuovo livello inside
With the selection active use the brush with the selected sparks to fill the inside layer - ora andate su filtro / sfocature / movimento // go to filter / blur / motion blur
Ecco l'imm // see the image
- Duplicate il livello inside e settatelo su Brucia // make a copy of the layer inside and set it as BURN

- Create un nuovo livello e chiamatelo "white center" // create a new layer and call it "white center"
- Usate lo strumento pennello colore bianco e usate "Circle Fuzzy (19)" // Use thebrush tool with the white color and the "Circle Fuzzy (19)" Circle Fuzzy (19)
Cliccate un paio di volte al centro del nuovo livello // make some clocks on the center of the new layer - Cambiate pennello e usate "Confetti" // change the brush with "Confetti"
Fate ancora qualche click nel livello white center // Make some other clicks on the white center layer
( nell' immagine ho nascosto il livello "inside e inside copia" per farvi vedere meglio il lavoro attuale // In this image I have hiden the layer "inside and inside copy" to better show the work )
- ora andate su filtro / sfocature / movimento // go to filter / blur / motion blur
- Create un nuovo livello sopra il livello sfondo e chiamtelo "verde1" // create a new layer over the background and call it "green1"
- usate lo strumento pennello e usate il "vine" // use the brush tool, select the vine brush
- create una linea poco al centro dell' immagine // create a line at the center of the image

- Applicate sul livello "verde1" il filtro: Filtro / Distorsione / Increspature // Use the filter: FIlter / Distort / Ripple on the flower layer
con le stesse impostazioni del livello flower // with the same option of the flower layer - Ora: Filtro / Distorsione / Coordinate Polari // And Now: Filter / Distort / Polar Coords
queste sono impostazioni diverse, dovete guardarle // this are different option you must see them
- ecco il risultato fino ad ora // this is the result for now

- duplicate il livello "verde1" // make a copyof the "green1" layer
- andate su filtro / sfocature / gaussina a 5pxs // go to filter / blur / gaussian blur at 5pxs

- settate il livello su differenza // set this layer to difference


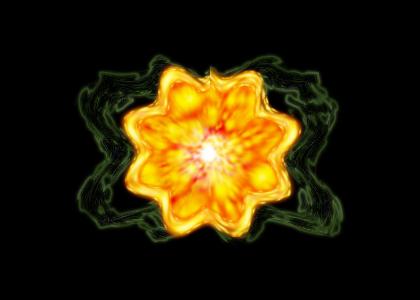
Finito // the End
Video:
by
Kain The Supreme