Cornice per immagini effetto 8bit / Simple Photo Frame - 8bit style effect
Facile - Easy

Questo/a opera è pubblicato/a sotto una Licenza Creative Commons.
VIDEO:
- ( "L1" )
Iniziate facendo una copia del livello base e rinominatelo in "l1".
You must start copying your initial layer and rename it as "l1". - Ora andate in Colori / Luminosità e Contrasto:
Now go on: Colors/ Brightness & Contrast:
- Ora andate in Colori / Sfocature / Selettiva Gaussiana:
Now go on: Colors/ Blur / Selective Gaussian Blur:
- Settate questo livello su "Schermo".
Set this layer as "Screen".
- ( "L2" )
Duplicate il livello "l1" e chiamatelo "l2", aggiungetegli il canale alpha ( Livello / Trasparenza / Aggiungi canale alfa ).
Duplicate the "l1" layer and rename it as "l2", add the alpha channel to it ( Layer / Transparency / Add alpha Channel ).
- Ora andate su: Filtri / Distorsioni / Cancella ogni altra riga.
Now go on: Filter / Distortions / Erase Every Other Row.
- Settate questo livello su "Schermo".
Set this layer as "Screen".
- ( "L3" )
Duplicate ancora il livello "l1" e posizionatelo in cima alla lista dei livelli, rinominatelo in "l3" e aggiungietegli il canale alpha se necessario ( settate il livello su "normale" ).
Duplicate again the "l1" layer, put it on the top to make it the top layer in the stack, rename in "l3" and add to it the alpha channel if needed ( set this layer as "normal" ).
- Ora andate su: Filtri / Distorsioni / Cancella ogni altra riga.
Now go on: Filter / Distortions / Erase Every Other Row.
- ( "L4" )
Create un livello vuoto, chiamatelo "l4", create una selezione che vi aggrada.
make a new empty layer, call it "l4", create a selection in to this layer of your taste.
- Ora andate in: Selezione / Distorci
Now go on: Selection / Distort
- E ancora, Ora andate in: Selezione / Distorci ( nuovi vlaori )
And again, Now go on: Selection / Distort ( new value )
- Ora andate su:Seleziona / Inverti
A questo punto riempite la selezione di nero e settate il livello su "brucia".
Now go on: Selection / Invert
At this point... fill the layer with black and set this layer on "burn".
- Andate su: Filtri / Luce ed Ombre / Proietta ombra
Go on: Filter / Light & Shadow / Dropshadow
- Invertite la selezione, Seleziona / Inverti
Invert the selection, Selection / invert
- Andate su: Filtri / Luce ed Ombre / Proietta ombra
Go on: Filter / Light & Shadow / Dropshadow
- Deselezionate tutto ( Seleziona / Niente ).
Desect all ( Selection / None ).
- Se volete "fondete" i due livelli di ombra ( DropShadow ).
If You want You can merge the 2 dropshadow layer.


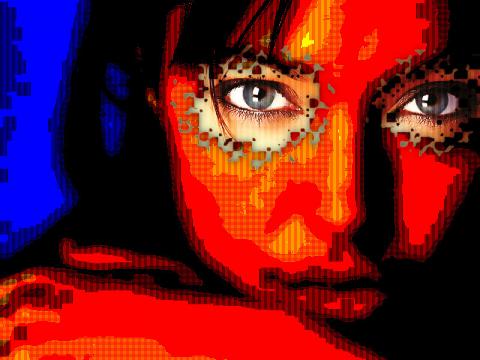
Final Result
Ecco il risultato finale - Ecco the Resulting Image.
Modifica 1 // Alteration 1
- Per creare una versione alternativa selezionate il livello nero ( nel mio tutorial è "l4" ) e andate su: Filtri / Artistici / Applica tela.
To make and alternative version select the black layer ( in my tutorial is "l4" ) and go to: Filter / Artistics / Apply Canvas.

Final Result (Alteration)
Ecco il risultato finale - Ecco the Resulting Image.
Gimp XCF
Potete scaricare il file originale per il Gimp ( XCF ) da questo link:
You can download the original Gimp File ( XCF ) from this link: