Galaxy abstract
Facile - Easy

Questo/a opera è pubblicato sotto una Licenza Creative Commons.
Video:
- Create una nuova immagine con sfondo nero // Create a new image with black background
- Andate in: Filtri / luce e ombra / Riflesso lenti // go to: Filter / Light and shadow / lens flare
( nel parametro della x dovete mettere la metà della lunghezza della vostra immagine e nell' y la metà dell'altezza della vostra immagine
in to the x parameter you must insert the half value of the width of your image and in to the y the half value of the high of your image )
- Ora andate su: filtri / luce e ombra / supernova // now go to: Filter / light and shadow / supernova
( x y are the half value of width and high )
- Copiate per 3 volte il vostro sfondo, rinominate i nuovi livelli come in foto e nascondete i due più in alto ( c2 e c3 )
Now copy your blackground for 3 times, and rename the new layer as show in this image... after this hide the 2 most top layer ( c2 and c3 )
- Selezionate il livello c1, andate su filtri / distorsioni / cordinate polari [deselezionate "a polare" come in foto ]
Select the c1 layer, go to: filter / distortion / polar coords [deselect "to polar" as shown in the image]
- Ora andate in livelli / trasforma / ruota di 180° // go to layers / transform / rotate of 180°

- ancora su filtri / distorsioni / cordinate polari [selezionate "a polare" come in foto ]
again on filter / distortion / polar coords [select "to polar" as shown in the image]
- settate c1 su sovrapposto / set c1 as overlay

- rendete visibile c2 e andate su filtri / distorsioni / increspature // make visible c2 and go to filter / distortion / ripple
( vedete l'immagine per le impostazioni // see the image for the basic values ) [vertical]
- settate c2 come: luce forte // set this layer as: hard light
- rendete visibile c3 e andate su filtri / distorsioni / increspature // make visible c2 and go to filter / distortion / ripple
( vedete l'immagine per le impostazioni // see the image for the basic values )[orizontal]
- settate c3 come: fusione grana // set this layer as: grain merge
- create una copia di c1 e posizionatelo in cima agli altri layer e rinominatelo come c4
make a copy of c1 and that this new layer as the most top see the image ( rename it as c4 )
- andate su filtro / sfocatura / movimento // go to: filter / blur / Motion blur

- andate su colori / colora e usate questi valori // now go to color / colorize with this setting

- settate questo livello su schermo // set this layer as screen


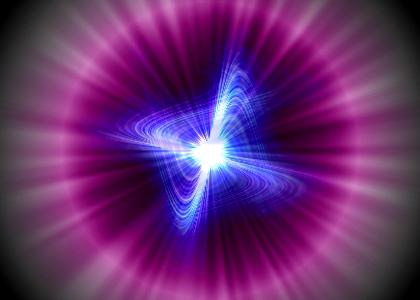
Ecco l'immagine finale // see the final image for this tutorial

by
Kain The Supreme.