Abstract Art / Astrattismo
Facile - Easy

Questo/a opera è pubblicato sotto una Licenza Creative Commons.
Video:
- Create una nuova immagine // Create a new image
- Selezionate lo strumento "pennello" scegliete il "pennello sparks" // Select the "brush" tool and choose "sparks" as selected brush

- Pennellate nel centro dell'immagine come in foto // Brush in the center of your image

- Ora andate su filtri / render / natura / Fiamma // Now go to filter / render / nature / flame
- Nel menù delle opzioni scegliete come gradient il "sunny harvest" // In the Option menù choos as gradient "sunny harvest"

- Ripetete questo procedimento ancora una volta.. cambiando la forma della fiamma // Changing the form/shapes apply again the flame filter
- Create un nuovo livello e "riempitelo" usando il pennello sparks ( chiamatelo "sparks" ) // create a new layer and fill it with the sparks brush ( call it "sparks" )

- Nascondete il livello "sparks" // Hide the sparks layer
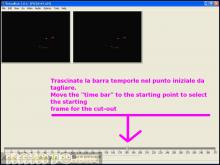
- selezionate lo sfondo, Andate su: Filtro / mappa / sposta usate le impostazioni come nell' immagine //Select the background, Go to: Filter / map / displace and use the settings showned in the image.

- Ora, rendete visibile il livello "sparks" e andate su Colori / Colorize ( scegliete un colore di vostro gradimento ) // Now make visible again the "sparks" layer and go to: Colors / Colorize ( choose a color that you like )
- Nella finestra dei livelli settate il metodo per "sparks" su brucia // set this layer as "burn"
- Create un nuovo livello sopra al livello "sparks" chiamatelo "flames2", usate ancora il filtro fiamma una o due volte a vostra scelta // Create a new layer over the "sparks" layer and call it "flames", use again ( one or two times ) the filter flame ( filter / render / nature / flame ).
- Colorate questo livello ( colori / colora ) // Give a color to this layer ( colors / Colorize ) [ 234,77,-22 ]
- Copiate il visibile ( Modifica / copia il visibile ) e incollatelo per creare un nuovo livello ^_^ // Go to Modify / Copy the visible [ Shift+Ctrl+C ] and than create a new layer with him
- Duplicate questo livello due volte // copy this new layer 2 times
- Selezionate il livello di mezzo tra quelli appena copiati e andate su Filtro / distorsione / Coordinate polari // Select the middle copy and go to: Filter / Distort / Polar Coords
Settate questo livello su: sovrapposto // set this layer to: overlay.
- Selezionate l'ultimo livello e andate su filtro / sfocatura / movimento ( zoom - vedi imm ) // select the top layer and go to: filter / blur / motion blur ( zoom - see the image )

- Settate il livello a "differenza" // set this layer as "difference" ( tonalità / hue )

- Come tocco finale // As final touch...
- Copiate il visibile ( Modifica / copia il visibile ) e incollatelo per creare un nuovo livello ^_^ // Go to Modify / Copy the visible [ Shift+Ctrl+C ] and than create a new layer with it

- Settatelo come "fusione grana" // set as "fusion grain"


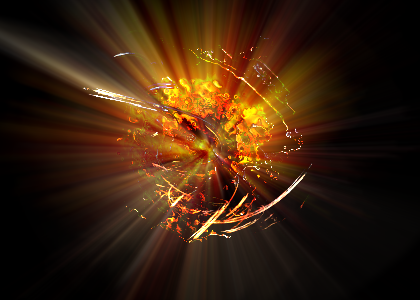
Altri esempi // other examples:


by
Kain The Supreme.